
When it comes to securing your website, an SSL certificate is not just a ‘nice-to-have’, but it’s a necessity.SSL does a lot behind the scenes, apart from encryption, like establishing trust with your visitors.
However, before you can obtain an SSL certificate, you must first generate a CSR (Certificate Signing Request), a block of encoded text that contains information about your domain and your company that is required to issue an SSL.
If you are using cPanel, generating a CSR is super straightforward. In this guide, we will walk you through the process step by step, making it easy for even first-time users to complete this process!
Let’s dive in and generate that CSR like a pro!
Also Read: Differences to Know Between SSL & TLS Certificates
Prerequisites Before Generating a CSR
Before you start, you need to ensure that:
- You have access to your cPanel account.
- You are familiar with the details of your organization (if you are generating an OV or EV certificate).
- You have your domain name ready.
Also Read: How to Install WordPress in cPanel?
Steps to Generate a CSR in cPanel
➔ Log in to your cPanel.
➔ Once logged in, you have to scroll down to the ‘Security’ section

➔ In that section, click on ‘SSL/TLS.’

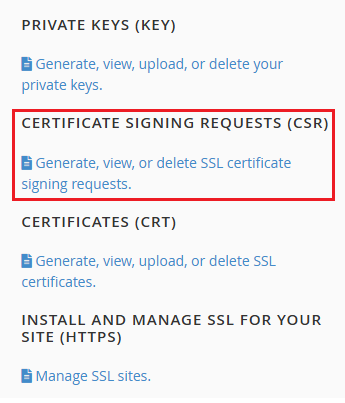
➔ A new page will open. On the right-hand side, under ‘Certificate Signing Requests (CSR)’, click on the link, ‘Generate, view, or delete SSL certificate signing requests.’
➔ In that, fill in the required details:
- Domain: Enter your domain name (e.g., example.com)
- City: Your city name
- State: Your state or province
- Country: Choose your country code (e.g., IN for India)
- Company Name: Your organization name or just your domain (for DV SSL)
- Company Division: Use IT or Web (can be general)
- Email: A valid email for contact
- Passphrase (optional): You can leave this blank unless your CA requires it
- Description (optional): It is created for your reference
➔ After filling out the form, double-check everything & click the ‘Generate’ button.

➔ After clicking generate, you will see your CSR code in a box. It will look something like:
| —–BEGIN CERTIFICATE REQUEST—– MIIC… …etc… —–END CERTIFICATE REQUEST—– |
➔ Just copy the entire CSR, including the BEGIN and END lines & save it in a secure location. You have to use this CSR when purchasing or issuing your SSL certificate from your Certificate Authority (CA)
What Happens Next?
Once you submit your CSR to a Certificate Authority:
- They will verify your details, which vary depending on the type of SSL.
- You will receive your SSL certificate file.
- Once you receive it, you will need to install the SSL certificate back in your cPanel account.
Also Read: How to Install a Free SSL Certificate in cPanel?
Conclusion
Generating a CSR in cPanel might sound technical at first, but it’s a simple task. It’s not just the first but the crucial step toward securing your website with SSL. Whether you run a blog, an e-commerce store, or a business portal, having an SSL certificate enhances trust and improves SEO.
Take that first step confidently & your secure site journey begins with this CSR!