
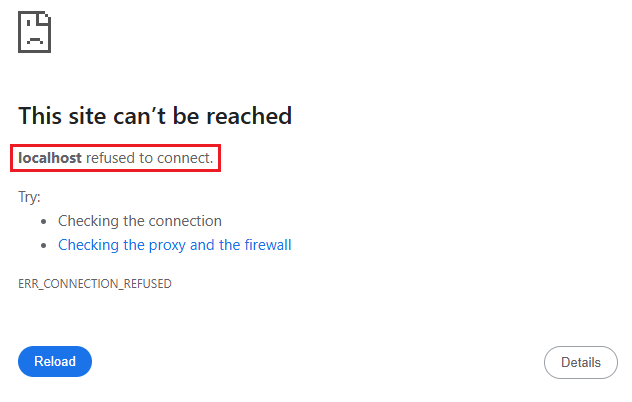
Are you trying to access your local web project through Chrome, but all you see is the dreaded message:
If you are a developer working with local environments, this error can bring your work to a standstill.
But what does this ‘localhost refused to connect’ mean?
It means your browser cannot connect to the server running on your machine, and the reasons can range from simple port conflicts to misconfigured files or firewalls.
This issue is common, and the good news is that it is fixable!
In this guide, we will walk you through tested, practical solutions to resolve this error step-by-step on Windows to help you get your local site running again in Chrome.
Let’s troubleshoot and fix it for good!
Also Read: How to Fix This Site Can’t Be Reached the Connection Was Reset
Solutions to Fix Localhost Refused to Connect in Chrome (Windows)
1. Flush DNS Cache
If Chrome shows ‘localhost refused to connect’, it is possible that your DNS cache may be outdated or corrupted. Flushing it can help force Windows to re-read the latest network settings.
Steps to Flush DNS on Windows:
➔ Open Command Prompt as Administrator by Pressing ‘Win + S’ & type ‘cmd’
➔ In that, you have to run the flush command:In that, you have to run the flush command:
| ipconfig /flushdns |
➔ Once you enter, you will see this:
| Windows IP Configuration Successfully flushed the DNS Resolver Cache. |
➔ Once done, check if the error is gone by restarting Chrome or your system.
Also Read: How to Fix the err name not resolved Chrome
2. Clear Browser Cache & Cookies
If your server is running correctly, but Chrome still displays ERR_CONNECTION_REFUSED, it may be due to an outdated cache or cookies conflicting with local server responses.
To do this, follow these steps:
➔ Open Google Chrome
➔ Once it gets opened, press ‘Ctrl + Shift + Delete’
➔ In that, you have to select:
- Time range: ‘All time’
- Check ‘Cookies and other site data’
- Check ‘Cached images and files’
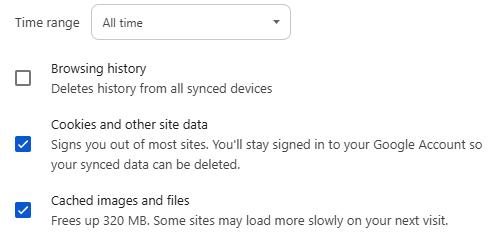
➔ Once you have checked these details, click ‘Delete data’

➔ After this, restart Chrome and try to open your local site.
Also Read: How to Fix Err Tunnel Connection Failed in Chrome
3. Alter or Clear HSTS Policies in Chrome
If you are still seeing the error ‘localhost refused to connect’ in Chrome and HSTS (HTTP Strict Transport Security) is involved, it’s likely because Chrome is forcing HTTPS on localhost, even if your local server isn’t configured for it.
Now, what’s this HSTS?
HSTS is a browser security policy that forces a site to load only over HTTPS. Chrome caches HSTS settings for domains, including localhost, if triggered.
So Chrome is forcing HTTPS on localhost, even if your local server isn’t configured for it. In this case, you need to modify the HSTS policies.
To do this, follow these steps:
➔ Open Google Chrome
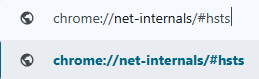
➔ In that, go to this internal URL: chrome://net-internals/#hsts
➔ Scroll to the ‘Delete domain security policies’ section.

➔ In the Domain field, enter: ‘localhost’

➔ Once you add, click ‘Delete’

This removes any cached HSTS rules, forcing HTTPS for localhost!
Now, you have to close all Chrome windows & restart Chrome fully, and access your localhost.
Also Read: How to Fix Website sent an invalid response ERR SSL_PROTOCOL_ERROR
4. Changing Firewall Settings
If this error still persists, you can change the firewall settings by turning it off. We understand that disabling your firewall reduces your system’s protection. You only have to do this temporarily for localhost troubleshooting. Turn it back on once testing is complete.
To do this, follow these steps:
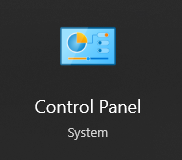
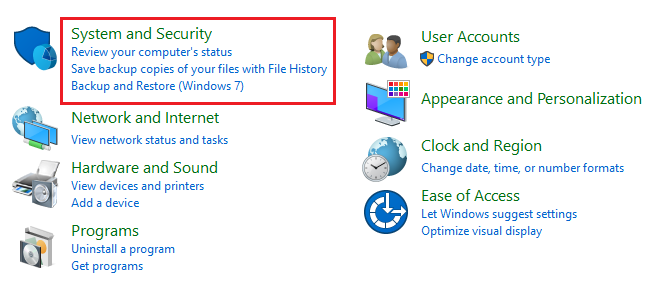
➔ Open the ‘Control Panel’ by searching for it in the Start menu.
➔ In that, click on ‘System and Security.’
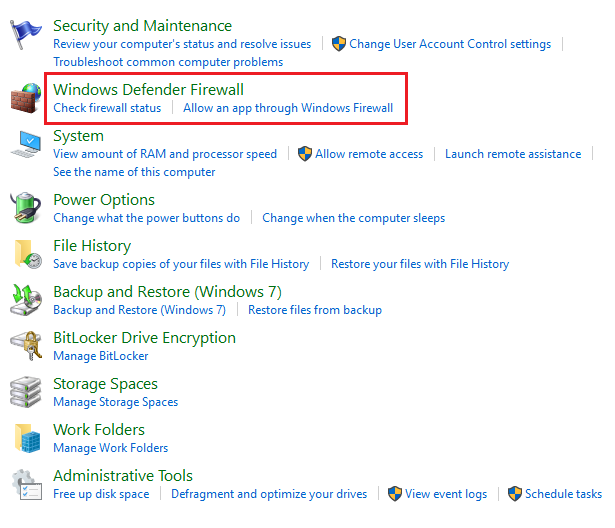
➔ From the options, select ‘Windows Defender Firewall.’
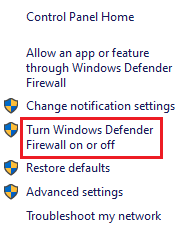
➔ On the left-hand sidebar, you need to click ‘Turn Windows Defender Firewall on or off’
➔ Under both Private network settings and Public network settings, select ‘Turn off Windows Defender Firewall (not recommended)’
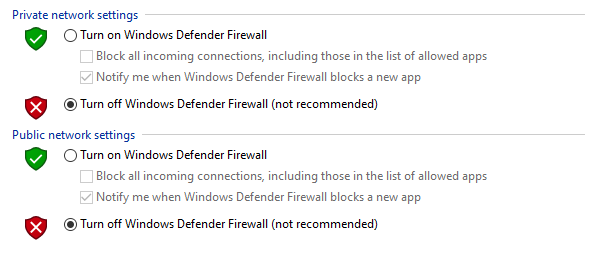
➔ Once done, click ‘OK’
Now, you have to try accessing it in Chrome again!
*Note: Once testing is done, you have to turn your firewall back on for your system’s security.
Also Read: How to Fix the 504 Bad Gateway Timeout Error?
Conclusion
The ‘Localhost Refused to Connect’ error can be frustrating, but it’s usually easy to fix with the right steps.
Here’s a quick recap:
Solution |
Works For |
Flush DNS Cache |
DNS resolution issues |
Clear Browser Cache & Cookies |
Outdated/corrupt cache |
Clear HSTS Settings in Chrome |
HTTPS enforcement issues on localhost |
Change Firewall Settings |
Port blocking by a firewall |
Following these steps should solve the issue for most users!