
Plesk Panel is a robust web hosting control panel favored by countless website administrators for its user-friendly interface and powerful features. Among its various functionalities, Plesk offers the seamless uploading of website files, a fundamental task for website deployment and maintenance.
Whether a seasoned developer or a novice website owner, mastering the art of uploading files in the Plesk Panel is crucial for effectively managing your online presence. In this comprehensive guide, we will walk you through the step-by-step process of uploading website files using the intuitive interface provided by Plesk Panel.
Let’s get started!
Also Read: How to Create a Database in the Plesk Panel?
Steps to Upload Website Content Files in Plesk
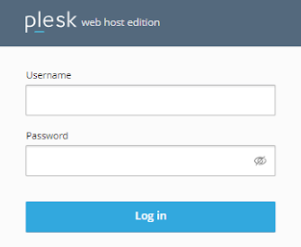
➔ Login to the Plesk panel on your preferred web browser by entering your username & password.
➔ After you log in, look for the ‘Files’ section on the dashboard.
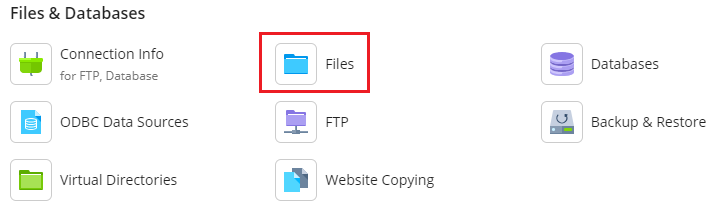
➔ In the File Manager, you will see a directory structure representing your server’s file system. You need to locate the directory corresponding to the website.

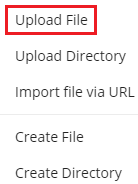
➔ Within your website’s directory, you will find an ‘+’ button icon. Click on it to open the dropdown.
![]()
➔ In the menu, click on the option ‘Upload File’
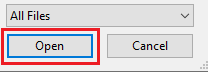
➔ In the file upload dialog, you can directly drag and drop files from your computer, or you can select files from the local storage.
➔ After selecting the files, click the ‘open’ button to begin the file upload process.
➔ A progress bar will display, indicating the status of each upload.

*Note: The upload process may take some time, depending on the size of the files and your internet connection speed. Do not navigate away from the page until all files have been successfully uploaded.
➔ Once the upload is complete, you can verify that the files have been successfully uploaded by refreshing the File Manager page. You should see the uploaded files listed within the directory of your website.
Don’t forget to Test the Website
After uploading the files, it’s a good practice to test your website to ensure everything functions as expected. You need to open a web browser and navigate to your website’s URL to confirm that the uploaded files are being served correctly.
Also Read: How to Create an Email Account in Plesk?
Conclusion
As you can see, uploading website files to the Plesk Panel is simple and can be completed using the built-in File Manager interface. Following these step-by-step instructions outlined in this guide, you can quickly upload files to your website and make them accessible to your visitors.