
Installing OpenClaw is only the first step. To start using it effectively, you need to complete OpenClaw’s onboarding and initial configuration. During onboarding, you will configure important settings such as the gateway mode, AI model provider, network access, authentication, chat integrations, and optional skills that determine how your OpenClaw instance behaves.
This guide walks you through the essential onboarding steps required to get OpenClaw up and running on your VPS. While these are the recommended configurations for a typical deployment, OpenClaw is highly customizable.
Depending on your environment, security requirements, and intended use case, you may choose different options or enable additional features that best suit your workflow.
Also Read: How to Install OpenClaw on Ubuntu in a VPS?
Steps to Know About the Onboarding of OpenClaw
➢ Step 1: Confirm the Security Notice
After running the onboarding command, OpenClaw will display the following security message: “I understand this is personal-by-default and shared/multi-user use requires lock-down. Continue?”
OpenClaw displays this message because it is designed for personal use by default. If you plan to make the gateway accessible to multiple users or expose it publicly, you will need to implement additional security measures such as proper authentication, firewall rules, and access controls.
Selecting ‘Yes’ confirms that you understand these recommendations and wish to continue with the installation.
Once you select ‘Yes ’, press Enter

➢ Step 2: Select the Setup Mode
Now, OpenClaw will ask you to choose a setup mode.
You will see the following options:
- QuickStart (Recommended)
- Manual Setup
In that, select ‘Manual Setup.’

★ Point to know
The Manual Setup option gives you full control over key gateway settings, including network exposure, authentication method, gateway port, and Tailscale integration. This is ideal for VPS deployments where you want to customize the installation rather than rely on the default configuration.
➢ Step 3: Config Handling
After this, the menu asks how you want to manage your existing configuration files.
You have to select ‘Keep current values’ & press Enter
It will reuse your existing configuration as-is!
➢ Gateway Selection
This step asks where the OpenClaw Gateway (the core service that connects your workspace, LLM, and chat clients) will run relative to this onboarding wizard.
You have to select the option ‘Local gateway (this machine).’

➢ Step 4: Select Model/auth provider
This step asks you to select the Large Language Model (LLM) provider that will power your OpenClaw AI assistant.
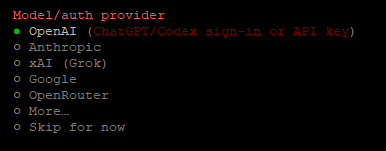
Select according to your choice and requirement.
Here, we have selected OpenAI. So, we have to enter its API key.
➢ Step 5: Review & Network Settings
Now, the screen prompts a summary of the underlying technical and network configuration for your OpenClaw gateway instance.
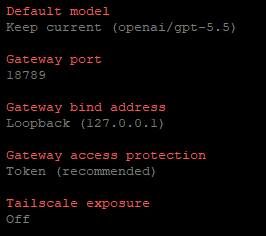
Configuration Fields:
➔ Default model: The AI model currently handling your prompts (e.g., openai/gpt-5.5).
➔ Gateway port: The local network port (18789) that listens for connections.
➔ Gateway bind address: Set to Loopback (127.0.0.1), meaning the service is restricted to this machine only.
➔ Gateway access protection: Uses a secure Token to authenticate connected clients and prevent unauthorized access.
➔ Tailscale exposure: Set to Off to keep the gateway local rather than sharing it across a private Tailscale network.
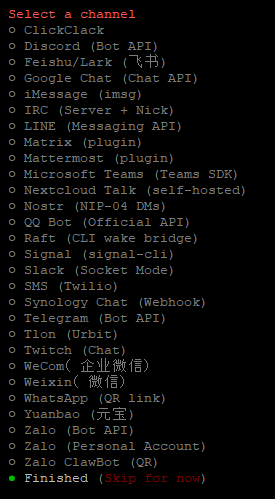
➢ Step 6: Chat Channel Setup
This step determines whether you want to immediately link an external messaging application to your AI assistant.

By selecting ‘Yes ’, it directs the wizard to move forward into configuring a supported messaging platform (such as WhatsApp, Telegram, Slack, or Discord). You will be prompted to choose a specific app and input its necessary credentials and configuration paths.
Choose this if you want to talk to your AI agent directly from the messaging apps you already use every day.
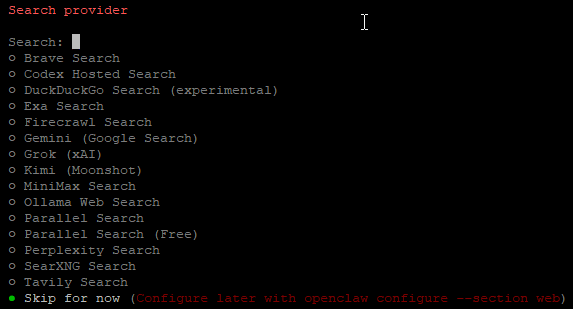
➢ Step 7: Select Search Provider
This step allows you to select a web search engine or tool that gives your AI agent real-time browsing capabilities to look up up-to-date information online.
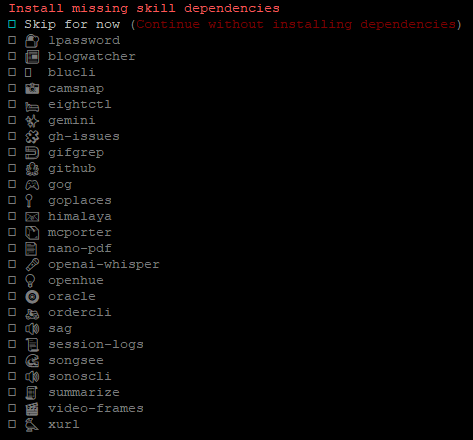
➢ Step 8: Configure Skills
This step asks whether you want to configure “skills” (tools, integrations, and plugins) for your OpenClaw AI assistant immediately.

Selecting ‘Yes’ moves you into a menu where you can enable specific capabilities for your agent. These include tools for interacting with your local computer, accessing databases, formatting documents, or reading system files.
That’s it! At the end, you will receive an OpenClaw Onboarding confirmation!
There are many steps ahead in OpenClaw’s onboarding process, which depends entirely on you.

Conclusion
You have now completed the essential onboarding of OpenClaw. Your AI gateway is ready to connect to your preferred LLM provider, accept secure client connections, and integrate with messaging platforms or additional skills as needed.
Keep in mind that these are the core configuration steps needed to get OpenClaw operational. Since every deployment is different, you can further customize network settings, authentication, integrations, skills, and other advanced options as your use case evolves.
As your requirements grow, OpenClaw provides the flexibility to adapt your AI environment without requiring a fresh installation!