
Running AI agents on your own server gives you greater control over your data, better performance, and the flexibility to customize your workflows. OpenClaw is an open-source AI gateway that lets you connect to, manage, and interact with AI services from your own infrastructure rather than relying entirely on hosted platforms.
Installing OpenClaw on an Ubuntu VPS is straightforward but requires preparing the server, installing Node.js, configuring the gateway, and securing the service to start automatically after every reboot.
In this knowledgebase article, you will learn how to install OpenClaw on an Ubuntu VPS from scratch, configure it as a system service, access the web dashboard, and pair your device for the first time. Every step is explained in simple language so you understand what you are doing and why, rather than simply copying commands.
Prerequisites
Before you begin, make sure you have:
- An Ubuntu VPS (Ubuntu 24 LTS)
- Root SSH access
- PuTTY (Windows) or Terminal (Linux/macOS)
- A stable internet connection
Steps to Install OpenClaw on Ubuntu in a VPS
|
➢ Step 1: Connect to Your Ubuntu VPS ➢ Step 2: Enable Safe Bash Execution ➢ Step 3: Create a Simple Logging Function ➢ Step 4: Update Ubuntu Packages ➢ Step 5: Install Node.js 22 ➢ Step 6: Create a Dedicated OpenClaw User ➢ Step 7: Install the Latest Version of OpenClaw ➢ Step 8: Complete the Initial OpenClaw Setup ➢ Step 9: Enable TLS ➢ Step 10: Allow Host Header Origin Fallback ➢ Step 11: Create the OpenClaw Systemd Service ➢ Step 12: Create the Compile Cache Directory ➢ Step 13: Enable and Start the Service ➢ Step 14: Get Your Gateway Token ➢ Step 15: Open the OpenClaw Dashboard ➢ Step 16: Connect to the Gateway ➢ Step 17: Approve Device Pairing ➢ Step 18: Log in to the OpenClaw User and Start Onboarding |
➢ Step 1: Connect to Your Ubuntu VPS
Before installing OpenClaw, you need to connect to your VPS using SSH.
If you are using Windows, open PuTTY, enter your VPS IP address, and log in using the root account.
After logging in successfully, you will see the terminal prompt.
★ Important Tip
Running the installation as root avoids permission-related issues during package installation and service configuration.
➢ Step 2: Enable Safe Bash Execution
To enable strict error handling in your shell session, run this command.
| set -euo pipefail |
It helps:
- Stopping immediately if any command fails
- Preventing undefined variables from causing unexpected behavior
- Detecting failures inside command pipelines
This makes the installation safer and easier to troubleshoot.
➢ Step 3: Create a Simple Logging Function
To create a small helper function for displaying readable log messages during installation, run the following command
| log() { echo “${LOG_TAG} $*”; } |
➢ Step 4: Update Ubuntu Packages
It is important to update Ubuntu to ensure it downloads the latest package information from its repositories.
Firstly run:
| apt update -y |
Then upgrade installed packages:
| apt upgrade -y |
★ Important Tip
Restart your VPS after a major system upgrade if the kernel has been updated.
➢ Step 5: Install Node.js 22
OpenClaw requires Node.js to run. For this, you have to first add the official NodeSource repository:
| curl -fsSL https://deb.nodesource.com/setup_22.x | bash |
Then install Node.js:
| apt-get install -y nodejs |
➢ Step 6: Create a Dedicated OpenClaw User
You have to create a separate user, as instead of running everything as root, OpenClaw runs under its own Linux account.
You have to run:
| useradd -m -s /bin/bash openclaw |
➢ Step 7: Install the Latest Version of OpenClaw
To install OpenClaw, run the following command:
| npm install -g openclaw@latest |
★ Tip
Installing the latest version gives you access to new features, bug fixes, and security improvements.
➢ Step 8: Complete the Initial OpenClaw Setup
To initialize OpenClaw automatically without requiring manual interaction, you have to run this command:
| su – openclaw -c “openclaw onboard –non-interactive –accept-risk –mode local –flow quickstart –skip-health” |
➢ Step 9: Enable TLS
To encrypt communication between your browser and the OpenClaw gateway, you have to enable TLS.
For this, run the following command:
| su – openclaw -c “openclaw config set gateway.tls.enabled true” |
➢ Step 10: Allow Host Header Origin Fallback
When accessing OpenClaw via a VPS IP address, browsers may reject requests due to host header validation. To ensure the dashboard works correctly in these situations, run the following command:
| su – openclaw -c “openclaw config set gateway.controlUi.dangerouslyAllowHostHeaderOriginFallback true” |
➢ Step 11: Create the OpenClaw Systemd Service
To make OpenClaw start automatically whenever your VPS boots, you will need to create a systemd service. A systemd service allows OpenClaw to run in the background and automatically restart if it stops unexpectedly.
Run the following command:
| cat > /etc/systemd/system/openclaw.service <<'UNIT' |
Now paste the following service configuration:
|
[Unit] Description=OpenClaw Gateway After=network.target [Service] Type=simple User=openclaw WorkingDirectory=/home/openclaw ExecStart=/usr/bin/openclaw gateway run –bind lan –port 18789 Restart=on-failure RestartSec=5 Environment=NODE_ENV=production Environment=NODE_COMPILE_CACHE=/var/tmp/openclaw-compile-cache Environment=OPENCLAW_NO_RESPAWN=1 [Install] WantedBy=multi-user.target UNIT |
This configuration will:
- Starts the OpenClaw gateway automatically after the network is available.
- Runs the service using the dedicated openclaw user instead of the root account.
- Launches the gateway on port 18789.
- Automatically restarts the service if it crashes or stops unexpectedly.
- Sets the required environment variables for production use.
- Enables the service to start automatically every time the VPS boots.
➢ Step 12: Create the Compile Cache Directory
To store temporary compilation cache files & helping OpenClaw launch more efficiently, create a cache directory with the following command:
| mkdir -p /var/tmp/openclaw-compile-cache |
➢ Step 13: Enable and Start the Service
After creating the service file, you need to reload systemd so it recognizes the new service. Enabling and starting the service ensures OpenClaw launches automatically on every server boot and begins running immediately without requiring manual intervention.
➔ To reload systemd:
| systemctl daemon-reload |
➔ To enable the service:
| systemctl enable openclaw.service |
➔ To start it:
| systemctl start openclaw.service |
★ Tip
To verify the service is running correctly, use:
systemctl status openclaw.service
If everything is working, you should see the service in the active (running) state.
➢ Step 14: Get Your Gateway Token
OpenClaw generates a unique gateway token during installation. To get that token, run the following command:
| grep token /home/openclaw/.openclaw/openclaw.json |
Just copy the token value, as you will need it when connecting to the dashboard.
➢ Step 15: Open the OpenClaw Dashboard
Now, it’s time to open your browser and visit: https://YOUR_SERVER_IP:18789
With your VPS’s public IP address.
Your browser will display a security warning because OpenClaw uses a self-signed TLS certificate by default.
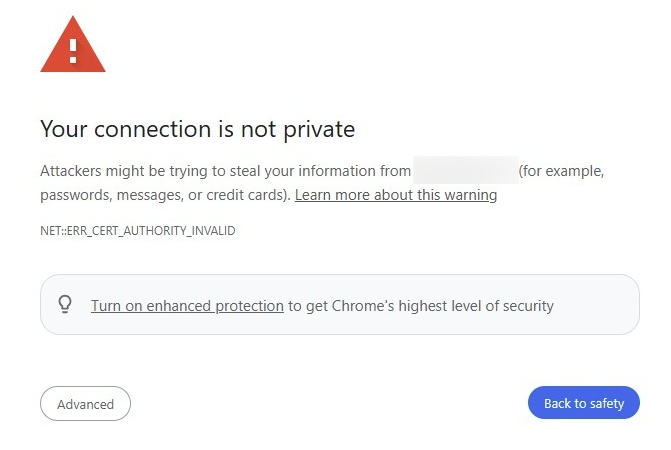
This is expected.
You have to simply click:
Advanced → Proceed anyway

➢ Step 16: Connect to the Gateway
Here, paste your Gateway Token into the Gateway Token field & click ‘Connect’
On your first connection, OpenClaw will request device approval. Don’t worry; below is the way for that approval.
➢ Step 17: Approve Device Pairing
For this approval process, you have to exit the OpenClaw user session by typing exit or pressing Ctrl+D. Once you are back to the root user on your Ubuntu VPS, continue with the device pairing steps below.
When you click the ‘Connect’ button, you will see a Request ID for approval in the box below.
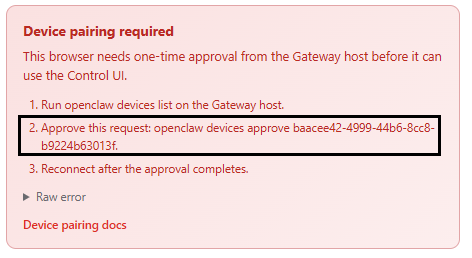
Just copy that code & paste it into the following command in the replacement of ‘PASTE-REQUEST-ID-HERE’:
| su – openclaw -c “openclaw devices approve PASTE-REQUEST-ID-HERE” |
Go back to the browser & click ‘Connect’ again.

You are now connected successfully!
★ Tip
Device pairing is required only once per browser or device. Future connections only require your Gateway Token.
➢ Step 18: Log in to the OpenClaw User and Start Onboarding
Once your device has been approved successfully, switch back to the dedicated openclaw user to complete the onboarding process by running the following command:
| su – openclaw |
Then start the onboarding wizard by running:
| openclaw onboard |
Also Read: OpenClaw Onboarding Guide – Steps to Know
Conclusion
Installing OpenClaw on an Ubuntu VPS may seem like a lengthy process at first, but once you complete each step in the correct order, you end up with a secure, reliable, and self-hosted AI gateway that is always ready to use.
From preparing your Ubuntu server and installing the required dependencies to configuring the gateway, enabling it as a system service, pairing your device, and completing the onboarding process, every step plays an important role in ensuring a stable deployment.
By hosting OpenClaw on your own VPS, you gain greater control over your environment, improved privacy, and the flexibility to manage your AI workflows without relying solely on third-party infrastructure.