
While working on a remote machine, one feature that significantly improves productivity is the ability to copy and paste content between your local computer and the remote desktop.
Whether you are transferring PowerShell commands, configuration files, URLs, passwords, or simple text, clipboard sharing eliminates the need to manually retype information, saving both time and effort. However, if clipboard redirection is disabled, even basic copy-and-paste operations won’t work, disrupting your workflow.
The best part is that Windows provides multiple ways to enable clipboard sharing in Remote Desktop. Depending on your setup, you can configure it through the Remote Desktop Connection settings, Group Policy, Registry Editor, or by restarting the clipboard service if it stops responding.
In this guide, you will learn what the Remote Desktop clipboard is, why it’s important, and the different methods to enable it on Windows. We will also cover common troubleshooting steps and practical tips to ensure copy-and-paste works reliably during your Remote Desktop sessions.
Also Read: How can you connect to a Remote Desktop using CMD?
Before You Begin
Before changing any settings, make sure:
- Remote Desktop (RDP) is already configured.
- You have permission to access the remote computer.
- Both Windows systems are updated.
- You have administrator access if changing Group Policy or Registry settings.
Also Read: How to Send Ctrl Alt Delete in Remote Desktop in Quick Ways?
Methods to Enable Clipboard in Remote Desktop on Windows
|
➢ Method 1: Enable Clipboard Before Connecting Through Remote Desktop ➢ Method 2: Enable Clipboard Using Remote Desktop App Settings (Windows App) ➢ Method 3: Enable Clipboard Using Group Policy ➢ Method 4: Enable Clipboard Through Windows Registry ➢ Method 5: Restart the Remote Desktop Clipboard Process (rdpclip.exe) |
➢ Method 1: Enable Clipboard Before Connecting Through Remote Desktop.
This is the easiest and most common method.
If clipboard sharing is disabled before connecting, copy and paste won’t work regardless of Windows settings.
➔ Search for ‘Remote Desktop Connection’ from the Windows Start menu and open it.

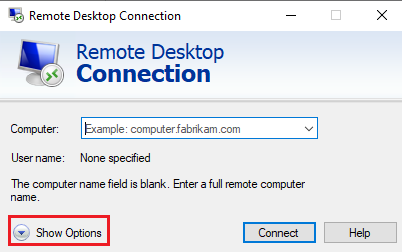
➔ A simple login window appears; click ‘Show Options.’
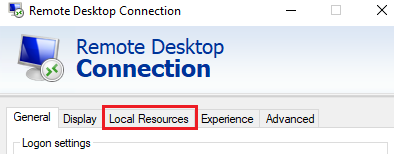
➔ You have to navigate to the ‘Local Resources’ tab.
➔ Under ‘Local devices and resources’, check ‘Clipboard.’
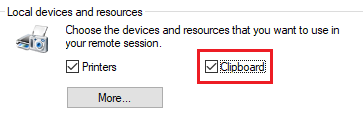
Checking this option allows Windows to redirect clipboard data between your local PC and the remote desktop during the session.
➔ Click ‘Connect’ and log in normally.
After the session starts, try copying text between both computers.
Also Read: How to Fix Remote Desktop Connection Has Stopped Working?
➢ Method 2: Enable Clipboard Using Remote Desktop App Settings (Windows App).
If you are using the newer Microsoft Remote Desktop application instead of the classic Remote Desktop Connection tool, clipboard sharing is configured inside the connection settings.
➔ Launch the saved Remote Desktop connection.
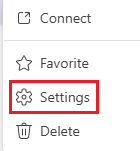
➔ Choose the connection and click ‘Three Dots.’

➔ Open ‘Settings’ from the option
➔ In that, locate ‘Redirections.’
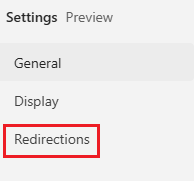
➔ Under ‘Mouse and keyboard’, enable ‘Clipboard.’
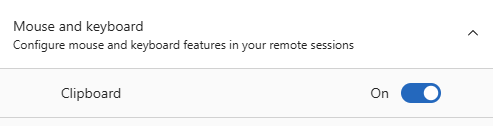
➔ Save the settings and reconnect.

After the session starts, try copying text between both computers.
Also Read: How to Change Password on Remote Desktop?
➢ Method 3: Enable Clipboard Using Group Policy.
In many organizations, administrators disable clipboard sharing for security reasons.
If you are an administrator, you can re-enable it using Group Policy.
➔ For this, you have to open the ‘Local Group Policy Editor.’ You have to press ‘Windows+R’ & type ‘gpedit.msc’ and press Enter.
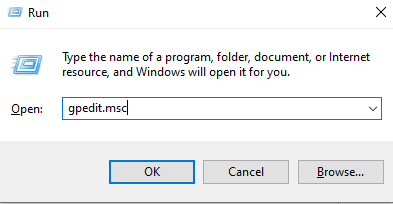
➔ Now, you have to navigate to the Remote Desktop Policies by: Computer Configuration>Administrative Templates>Windows Components>Remote Desktop Services>Remote Desktop Session Host>Device and Resource Redirection.
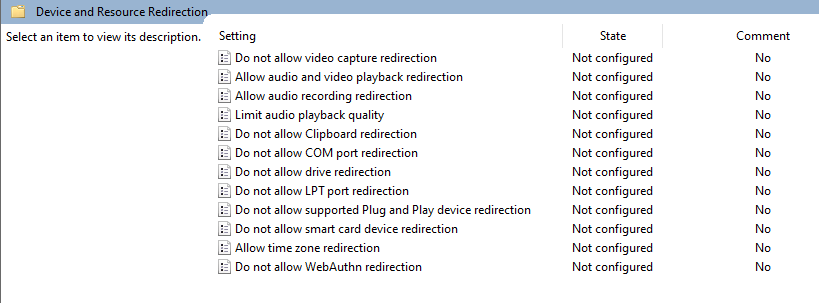
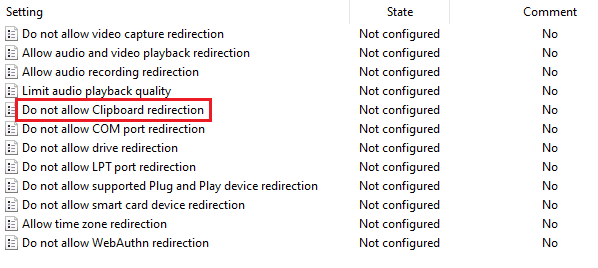
➔ Locate ‘Do not allow Clipboard redirection’ & Double-click it.
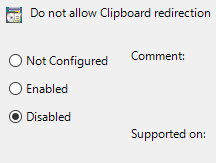
➔ In that, choose ‘Disabled’ & click ‘OK.’
➔ Disconnect and reconnect to the Remote Desktop.
After the session starts, try copying text between both computers.
Also Read: How to Check Users Logged in Remote Desktop?
➢ Method 4: Enable Clipboard Through Windows Registry.
If Group Policy Editor isn’t available (such as on Windows Home editions), you can configure the same setting through the Windows Registry.
★ Important Note
Editing the Registry incorrectly can cause Windows issues. Create a backup or restore point before making changes.
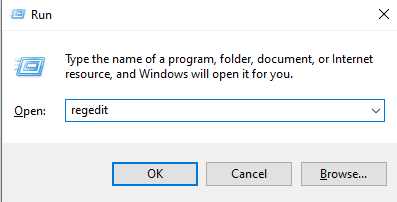
➔ For this, you have to open the ‘Open Registry Editor.’ You have to press ‘Windows+R’ & type ‘regedit’ and press Enter.
➔ Navigate to the Remote Desktop Policy Key by HKEY_LOCAL_MACHINE>SOFTWARE>Policies>Microsoft>Windows NT>Terminal Services
➔ Look for the DWORD value: fDisableClip
- Set it to 0 to allow clipboard redirection.
- If it doesn’t exist, create a new DWORD (32-bit) Value named fDisableClip and assign it a value of 0
➔ Restart the remote computer or sign out and reconnect to the Remote Desktop session.
After the session starts, try copying text between both computers.
Also Read: How to Restrict Kick Off During a Remote Desktop Connection?
➢ Method 5: Restart the Remote Desktop Clipboard Process (rdpclip.exe).
Sometimes the clipboard feature is enabled, but it stops working because the clipboard process has become unresponsive.
Restarting it usually restores copy-and-paste functionality.
- Open Task Manager on the Remote Computer
- Under the ‘Details’ tab, find: rdpclip.exe
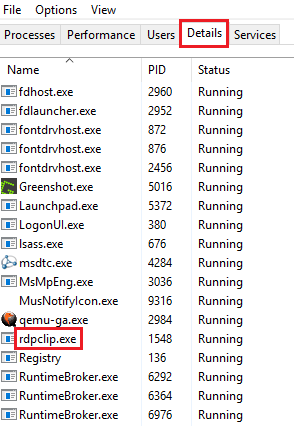
➔ Right-click rdpclip.exe and choose ‘End Task.’
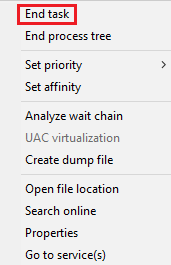
➔ Open Run, type ‘rdpclip.exe’, and press Enter
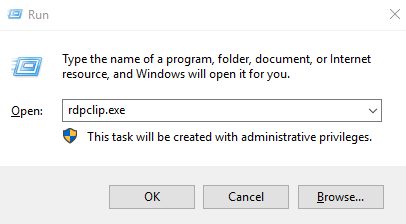
Launching the process again restarts clipboard synchronization without rebooting the entire system.
Also Read: How to Show Unpinned Remote Desktop?
Common Reasons Clipboard isn’t Working
Even after enabling clipboard sharing, it may still fail because of:
- Clipboard option disabled before connecting.
- Group Policy restrictions.
- Domain administrator security policies.
- rdpclip.exe not running.
- Temporary Remote Desktop session issues.
- Corrupted Windows clipboard service.
- Older Remote Desktop client versions.
- Windows updates pending on either machine.
Also Read: How to Print to a Local Printer from a Remote Desktop?
Best Practices for Clipboard Redirection
To ensure a smooth and secure experience:
- Enable clipboard only when you need it.
- Disconnect idle Remote Desktop sessions.
- Keep Windows and the Remote Desktop client updated.
- Avoid copying sensitive data to shared or public computers.
- Save your RDP configuration after enabling clipboard to avoid repeated setup.
Also Read: How to Open Task Manager in Remote Desktop?
Conclusion
Clipboard redirection is one of the simplest yet most valuable features of Remote Desktop. It removes the need to manually type commands, copy long URLs, or recreate files between your local computer and the remote Windows system.
In most cases, enabling the Clipboard option in the Remote Desktop Connection settings is enough. If it still doesn’t work, checking Group Policy, updating the Registry (where applicable), or restarting the rdpclip.exe process usually resolves the issue.
By understanding how clipboard redirection works and knowing the different ways to enable and troubleshoot it, you can make your Remote Desktop sessions faster, more productive, and far more convenient.