
Imagine you are working on a remote server, office computer, or VPS through Remote Desktop Connection (RDP), and you need to print an invoice, report, shipping label, or any important document. The file exists on the remote machine, but the printer is connected to your local computer. Downloading the file first and then printing it can be time-consuming and inconvenient.
Fortunately, Remote Desktop includes a feature called Printer Redirection, which allows you to use your local printer directly from the remote session. Once configured correctly, the remote computer can detect and send print jobs to the printer connected to your local device.
In this guide, you will learn what local printer redirection is, why it is useful, and how to enable printing from a Remote Desktop session in a few simple steps.
Also Read: How to Send Ctrl Alt Delete in Remote Desktop in Quick Ways?
Why is Printer Redirection Important?
Printer redirection offers several advantages:
➢ Saves Time
You don’t need to download files from the remote computer before printing.
➢ Improves Productivity
Users can print reports, invoices, contracts, and documents directly from the remote session.
➢ Reduces File Transfers
Avoid sending sensitive documents through email or cloud storage just to print them.
➢ Simplifies Remote Work
Employees working remotely can continue using their existing local printers without additional setup.
Also Read: How to Fix Remote Desktop Connection Has Stopped Working?
Before You Begin
Before enabling printer redirection, verify the following:
- Remote Desktop Connection (RDC) is installed on your computer.
- Your local printer is working correctly.
- The printer appears in Windows Devices and Printers.
- You have permission to access the remote machine.
- The remote system supports printer redirection.
★ Quick Tip
Before starting a Remote Desktop session, print a test page locally. This confirms that the printer is functioning properly and helps prevent later troubleshooting.
Also Read: How to Check Users Logged in Remote Desktop?
Process to Enable Local Printer Access in Remote Desktop
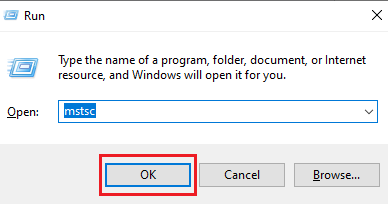
➜ To start, press ‘Windows + R’, type ‘mstsc’, and click ‘OK’. This opens the Remote Desktop Connection application.
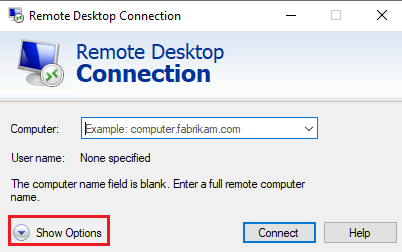
➜ Click ‘Show Options’ at the bottom-left corner of the Remote Desktop Connection window. This reveals additional configuration settings.
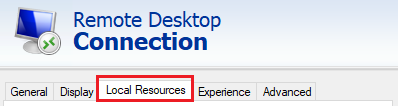
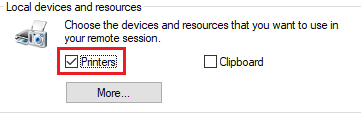
➜ Select the ‘Local Resources’ tab.
➜ Under the ‘Local devices and resources’ section, locate the ‘Printers’ checkbox.

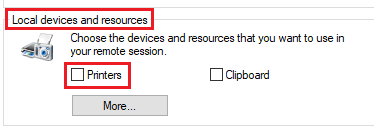
➜ Check the box labeled ‘Printers’. By enabling this option, Windows tells the remote computer to detect and use printers connected to your local machine.
★ Quick Tip
If you regularly connect to the same server, save your RDP configuration after enabling printer redirection. This prevents you from repeating the setup every time.
➜ Go back to the ‘General’ tab and connect to RDP using your credentials.

➜ Once connected, open the ‘Control Panel’ inside the remote desktop and navigate to ‘Devices and Printers’.
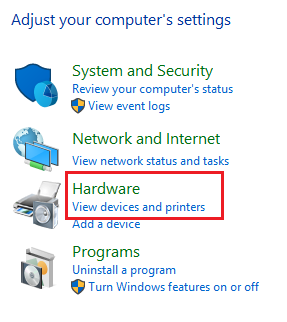
There you will see your local printer listed. This means the remote machine has successfully detected and mapped your local printer.
Now, you can print a test document to confirm that communication between the remote computer and the local printer is functioning correctly.
Also Read: How to restart the RDP without rebooting the Windows server?
Troubleshooting Printer Redirection Issues
Sometimes printers do not appear in the remote session. Here are a few common solutions.
➢ Check Whether Printer Redirection Is Enabled
Reconnect and verify that the ‘Printers’ checkbox is selected under ‘Local Resources’.
➢ Restart the Remote Desktop Session
Changes to local resource settings only apply when a new session starts. You have to disconnect completely and reconnect.
➢ Verify the Printer Works Locally
If Windows cannot print locally, Remote Desktop cannot redirect the printer.
Try printing a test page from your local computer first!
➢ Update Printer Drivers
Outdated or incompatible printer drivers can prevent successful redirection. Install the latest drivers provided by the printer manufacturer.
➢ Confirm Group Policy Settings
In some business environments, administrators disable printer redirection through Group Policy settings.
If you are using a company-managed server, contact the system administrator to verify that printer redirection is allowed.
★ Quick Tip
For shared office environments, assign a default printer before connecting through RDP. This helps avoid accidentally sending documents to the wrong printer
Also Read: A Guide to Fix RDP Error: An Internal Error has Occurred
Conclusion
Printing from a Remote Desktop session to a local printer is one of the most useful productivity features available in Windows Remote Desktop. By enabling printer redirection, you can print documents stored on a remote computer directly to your local printer without manually transferring files.
The setup process takes only a few minutes and can significantly simplify remote work, server management, and day-to-day business operations. Once configured, your local printer becomes available inside the remote session, allowing you to work and print as if you were sitting in front of the remote machine itself.
If the printer does not appear immediately, verify that printer redirection is enabled, confirm the printer works locally, and reconnect the Remote Desktop session. In most cases, these simple checks resolve the issue quickly.