
Ever wished you could manage all your emails—personal, professional, and business from one place?
Imagine not having to log in to multiple webmail accounts every morning!
Sounds great, right?
That’s exactly what you can do by configuring Roundcube Webmail in Gmail. Gmail allows you to send and receive emails from your Roundcube (webmail) account directly inside your Gmail inbox. This setup saves time, keeps your workflow simple, and ensures you never miss an important message again.
In this guide, we will walk you through configuring your Roundcube Webmail in Gmail using POP3 and SMTP settings. Even if you are doing this for the first time, don’t worry, this guide will explain everything clearly!
Also Read: How to Change Font Size in Roundcube Webmail?
Step-by-Step Guide to Configure Roundcube Webmail in Gmail
Let’s go step by step to set this up smoothly.
➢ Step 1: Log in to Your Gmail Account
➔ Open your Gmail account on your browser.
➔ Click the Gear icon (⚙️) in the top-right corner.

➔ Select ‘See all settings.’
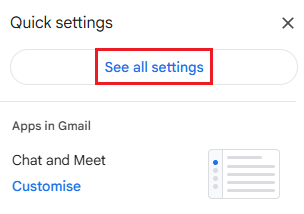
➔ Now, switch to the ‘Accounts and Import’ tab.

This is where you will find all the options to connect another email account to Gmail.
Also Read: Guide to Set Auto Reply in Roundcube Webmail
➢ Step 2: Add Your Roundcube Email Account
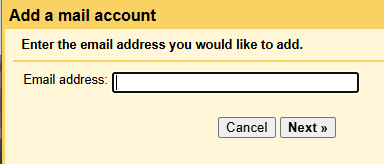
➔ Under ‘Check mail from other accounts’, click on ‘Add a mail account.’

➔ A new window will pop up; this is where you will enter your Roundcube email details.
Also Read: How to Send Calendar Invite in cPanel Roundcube Webmail?
➢ Step 3: Enter Your Roundcube Email Address
➔ You have to type your full Roundcube email address.
For example: yourname@yourdomain.com
➔ Then click ‘Next.’
➔ Gmail will ask what type of connection you want to make. You have to choose: ‘Import emails from my other account (POP3)’
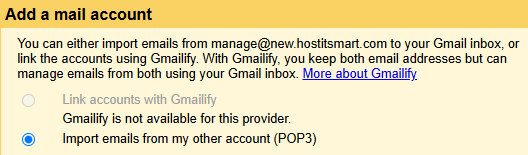
➔ Once you choose, click ‘Next.’

Also Read: Guide to Add a Profile Picture in RoundCube Webmail
➢ Step 4: Enter POP3 Mail Server Details
➔ Now, you need to provide the incoming mail server information for Roundcube.
Here’s how to fill it:
- Username: Your full email address (e.g., yourname@yourdomain.com)
- Password: Your email account password
- POP Server: Usually, it’s mail.yourdomain.com
- Port: 995 (for SSL enabled) or 110 (without SSL)
Also Read: Guide to Change the Password in RoundCube Webmail
➔ You have to check the box that says:
- ‘Always use a secure connection (SSL) when retrieving mail’
- ‘Label incoming messages’ – to easily identify which emails are coming from your Roundcube account.
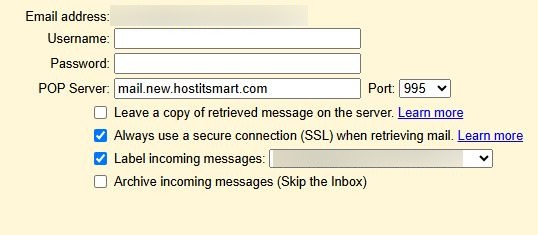
➔ Once done, click ‘Add Account.’

Also Read: Guide to Block Email on RoundCube Webmail
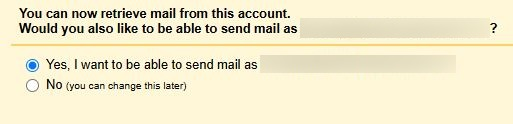
➢ Step 5: Configure Outgoing Mail (SMTP) Settings
Now Gmail will ask whether you want to send emails from your Roundcube address.
➔ Select ‘Yes’, and click ‘Next.’
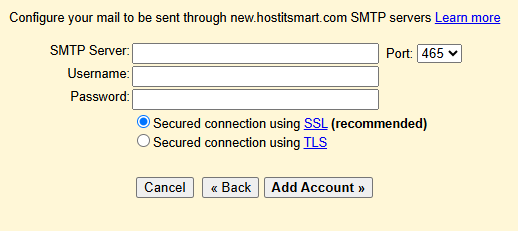
➔ You have to enter the following details:
- Name: The name you want your recipients to see (for example, your company name).
- SMTP Server: Usually mail.yourdomain.com
- Port: 465 (for SSL) or 587 (for TLS)
- Username: Your full email address
- Password: Your email password
Now, select ‘Secured connection using SSL’ or ‘TLS’, and click ‘Add Account.’
Also Read: Guide to Add a Signature to Roundcube Webmail
➢ Step 6: Verify the Configuration
➔ Once you click ‘Add Account’, Gmail will send a verification email to your Roundcube address.

Open your Roundcube Webmail account in a new tab, log in, and find the email from Gmail. You have to copy the verification code and paste it into the Gmail setup window, or click the link provided in that email.
Once verified, you are done!
Common Troubleshooting Tips
If you face any issues while configuring:
➔ Check Username & Password: Ensure you’ve entered the correct email credentials.
➔ Verify Mail Server Names: Use mail.yourdomain.com for both incoming and outgoing servers (or check with your hosting provider).
➔ Ports & Security:
- POP3 (Incoming): 995 with SSL
- SMTP (Outgoing): 465 (SSL) or 587 (TLS)
➔ Firewall or ISP Restrictions: Some ISPs block specific ports. If emails aren’t coming through, try switching from SSL to TLS or changing the port number.
Quick Example Setup
Let’s say your email is info@hostitsmart.com.
Then your settings would look like this:
Type |
Server |
Port |
Security |
|---|---|---|---|
Incoming (POP3) |
mail.hostitsmart.com |
995 |
SSL |
Outgoing (SMTP) |
mail.hostitsmart.com |
465 |
SSL |
Conclusion
And that’s it! You have successfully configured Roundcube Webmail in Gmail!
Now you can manage all your emails from one single inbox without jumping between tabs or remembering multiple passwords. It’s a simple setup that makes your digital life way more organized and productive.